5 Scientific Method Experiments For Kids
We may earn a commission for purchases made using our links. Please see our disclosure to learn more.
Kids are little investigators by nature. They poke things, ask “why” a dozen times before breakfast, and somehow turn a cup of water into a full science situation. That curiosity is exactly why Scientific Method Experiments For Kids work so well.
The scientific method gives all that curiosity a simple path. Instead of guessing and moving on, kids learn how to ask a question, make a prediction, test it, watch what happens, and talk about what they discovered.
And no, you do not need a fancy lab, expensive equipment, or a child who already loves science. A kitchen table, a few household supplies, and a little patience can do a lot.
In this guide, you will find five easy experiments, simple ways to explain the scientific method, helpful STEM tools, safety tips, and ideas for keeping kids interested without making it feel like homework.
What Is the Scientific Method?
The scientific method is a simple process scientists use to test ideas. For kids, you can explain it as a way to answer questions by trying things out.
A kid-friendly version looks like this:
- Ask a question
- Make a hypothesis
- Do an experiment
- Watch closely
- Write down or draw what happened
- Share what you learned
The goal is not to be perfect. It is not even to be right every time. The real goal is to think carefully and notice what happens.
That is where the learning starts.
Why Scientific Method Experiments For Kids Matter
Scientific Method Experiments For Kids help children move from “I think” to “Let’s find out.”
That shift matters.
When kids experiment, they practice patience, problem-solving, observation, and flexible thinking. They also learn that mistakes are not the end of the story. Sometimes, a wrong guess leads to the best conversation.
Instead of simply saying, “It worked,” kids start asking better questions:
- Why did it work?
- What changed?
- What stayed the same?
- Would it happen again?
- What should we test next?
That kind of thinking supports STEM learning far beyond one afternoon activity.
How to Set Up a Kid-Friendly Science Space
You do not need to turn your home into a science center. Honestly, that sounds exhausting.
A small setup is enough.
Gather a few basics:
- A tray or baking sheet
- Paper towels
- Measuring cups
- Plastic spoons
- Small bowls
- Safety goggles
- A notebook
- Washable markers
- A timer
A tray is especially helpful because it keeps spills from spreading across the table like a tiny indoor flood.
Keep the space relaxed. Kids focus better when they feel free to explore without worrying about making everything perfect.
Experiment 1: Which Paper Towel Absorbs the Most Water?
This is a great first experiment because the results are easy to see.
Question
Which brand of paper towel soaks up the greatest amount of water?
Hypothesis
Ask your child to choose which paper towel they think will hold the most water and explain why.
Materials
- 3 different paper towel brands
- Water
- Measuring cup
- Bowl
- Tray
- Notebook
Steps
- Pour the same amount of water into a bowl.
- Dip one paper towel sheet into the water.
- Let it sit for 10 seconds.
- Lift it carefully.
- Notice how much water remains in the bowl.
- Repeat with each paper towel.
- Compare the results.
What Kids Learn
Kids learn about absorption, measurement, variables, and fair testing. They also see why using the same amount of water each time matters.
This is a simple experiment, but it quietly teaches big science habits.
Experiment 2: Does Temperature Affect How Fast Ice Melts?
This one feels like a tiny weather experiment at home.
Question
Which type of water makes ice melt the fastest: warm, cold, or room-temperature water?
Hypothesis
Ask your child which cup they think will melt the ice fastest.
Materials
- 3 clear cups
- Ice cubes
- Warm water
- Cold water
- Room-temperature water
- Timer
Steps
- Fill each cup with the same amount of water.
- Place one ice cube in each cup.
- Start the timer.
- Watch each ice cube.
- Record which one melts first.
- Compare the times.
What Kids Learn
Children explore temperature and how heat moves from one object to another. They also practice comparing results in a fair way.
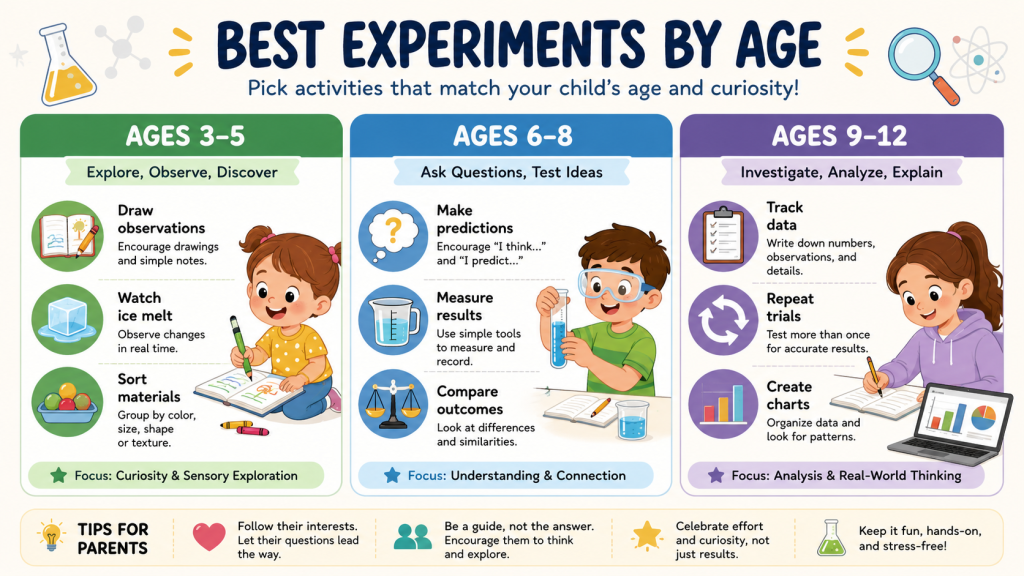
For younger kids, simply watching the ice shrink is enough. Older kids can time each cup and create a simple chart.
Experiment 3: Which Surface Creates the Most Friction?
If you have a toy car, you already have a physics lesson waiting nearby.
Question
Which surface slows a toy car down the most?
Hypothesis
Ask your child whether carpet, tile, cardboard, or a towel will create the most friction.
Materials
- Toy car
- Cardboard ramp
- Carpet
- Tile or smooth floor
- Towel
- Measuring tape
Steps
- Set up a small ramp.
- Roll the toy car down onto one surface.
- Measure how far the car travels.
- Repeat the test three times.
- Try the other surfaces.
- Compare the distances.
What Kids Learn
This experiment introduces force, motion, friction, and repeated trials.
It also helps kids understand why scientists test more than once. One roll can be a fluke. Three rolls give you a better idea of what is really happening.
Experiment 4: Do Plants Grow Better With Sunlight?
This experiment takes a little longer, but it teaches patience beautifully.
Question
Do plants grow better with sunlight or without sunlight?
Hypothesis
Ask your child what they think will happen to each plant.
Materials
- 2 small plants or seedlings
- Water
- Notebook
- Ruler
- Sunny window
- Dark cabinet or shaded area
Steps
- Place one plant near a sunny window.
- Put the other plant in a darker spot.
- Water both plants equally.
- Measure their height every few days.
- Notice leaf color, stem strength, and growth.
- Write or draw the results.
What Kids Learn
Kids learn about plant growth, sunlight, observation, and controlled variables.
This experiment also shows that not all science happens quickly. Some discoveries need time.
That is a useful lesson for kids and, honestly, adults too.
Experiment 5: Which Liquid Cleans Pennies Best?
This experiment feels a bit like magic, but it is really chemistry.
Question
Which liquid cleans dirty pennies best?
Hypothesis
Ask your child to predict which liquid will work best.
Materials
- Dirty pennies
- Vinegar
- Lemon juice
- Water
- Dish soap
- Small cups
- Paper towels
Steps
- Place one penny in each cup.
- Pour a different liquid into each cup.
- Wait 5 to 10 minutes.
- Remove the pennies.
- Wipe them gently.
- Compare how clean they look.
What Kids Learn
Kids explore acids, chemical reactions, and careful observation.
Vinegar and lemon juice often work well because they are acidic. You do not need to explain every chemistry detail to younger kids, though. Let them notice first. The explanation can come after the “Whoa, look at that!” moment.
How to Teach Variables Without Making It Boring
The word “variable” sounds serious, but the idea is simple.
A variable is the one thing you change in an experiment.
You might say:
“The variable is the thing we are testing.”
In the ice experiment, the variable is water temperature. Everything else should stay the same, like the cup size, amount of water, and ice cube size.
A good analogy is baking. If you change the sugar, flour, oven temperature, and baking time all at once, you will not know why the cookies came out strange. Science works the same way.
Change one thing at a time.
How to Help Kids Make a Hypothesis
A hypothesis is a thoughtful guess.
Kids often want to know if their guess is “right.” Reassure them that the guess is only the starting point.
Use this sentence frame:
“I think ______ will happen because ______.”
Examples:
- I think warm water will melt ice fastest because heat melts ice.
- I think the plant in sunlight will grow better because plants need light.
- I think vinegar will clean the penny best because it is sour and strong.
The “because” part is important. It helps kids explain their thinking instead of tossing out a random guess.
How to Record Results Like a Young Scientist
A simple science notebook makes experiments feel more official.
Kids can record:
- Date
- Question
- Hypothesis
- Materials
- Steps
- Observations
- Results
- Conclusion
Younger kids can draw what happened. Older kids can write sentences, make charts, or take measurements.
Do not worry about perfect spelling or neat handwriting. The point is to help kids slow down and notice details.
A messy notebook with real observations is better than a perfect worksheet with no thinking behind it.
Easy Ways to Make Science Experiments More Inclusive
Every child learns differently. Some kids love writing. Others would rather draw, talk, build, pour, measure, or move around.
That is not a problem. That is an opportunity.
Try these ideas:
- Let visual learners draw their results
- Let talkative kids explain the experiment out loud
- Let hands-on learners pour and measure
- Let younger siblings handle safe steps
- Let older kids lead the setup
- Let kids use their home language to explain what they noticed
Science should feel welcoming. It should not feel like a club with complicated rules.
Best Products for Scientific Method Experiments For Kids
The right tools can make science easier, cleaner, and more exciting. Here are five helpful Amazon products for hands-on STEM learning.
NATIONAL GEOGRAPHIC Mega Science Lab Experiments
This kit gives kids a wide mix of earth science, chemistry, and science magic activities.
Features:
- 45 hands-on experiments
- Bonus experiment guide
- Activities like volcanoes, crystals, and reactions
Best for:
Kids who love variety and want a big science kit they can return to again and again.
Learning Resources Primary Science Lab Activity Set
This set gives younger kids safe, colorful science tools that feel real without being overwhelming.
Features:
- Kid-friendly beakers, test tubes, and droppers
- Activity cards
- Durable pieces for repeated use
Best for:
Preschool and early elementary kids who enjoy pretend play and simple experiments.
Scientific Explorer My First Mind Blowing Science Kit
This kit introduces basic science ideas through fun reactions and hands-on activities.
Features:
- 20-piece kit
- Chemistry-based activities
- STEM-focused experiments
Best for:
Kids who love fizzy, colorful experiments and exciting reactions.
NATIONAL GEOGRAPHIC Junior Chemistry Set
This beginner chemistry set works well for younger learners who are ready for guided science play.
Features:
- 50 science experiments
- 20+ lab tools
- Early learning focus
Best for:
Kids ages 4–6 who need simple, safe, adult-supported activities.
Learning Resources Primary Science Deluxe Lab Set
This larger lab set gives kids more tools for testing, pouring, observing, and recording.
Features:
- 45 pieces
- Test tubes, funnels, goggles, and activity cards
- Designed for early STEM learning
Best for:
Families, homeschoolers, and classrooms that want reusable science tools.
Research-Backed Benefits of Inquiry-Based STEM Learning
Research supports the value of inquiry-based learning, especially when students ask questions, test ideas, and explain their thinking.
A 2024 systematic review on inquiry-based science education reviewed research from 2000 to 2022 and highlighted how inquiry-based approaches help connect science teaching with investigation, reflection, and evidence-based thinking.
The Next Generation Science Standards also emphasize science practices such as asking questions, planning investigations, analyzing data, and constructing explanations. Their guide to science and engineering practices shows why students benefit from doing science, not just memorizing facts.
That is why Scientific Method Experiments For Kids are so powerful. They turn children from passive listeners into active thinkers.
How Drones Can Extend STEM Learning
Once kids understand testing, observation, and results, you can introduce more advanced STEM tools.
Drones are a fun example. They can help kids explore flight, motion, engineering, weather, direction, and problem-solving.
If your child is curious about flying technology, this guide to the best children’s drones for STEM learning is a helpful next step:
A drone does not have to be just a toy. With the right questions, it can become a flying science lesson.
Safety Tips for Home Science Experiments
Good safety habits keep science fun and calm.
Use these simple rules:
- Always supervise young kids
- Use safety goggles when mixing liquids
- Do not let kids taste experiment materials
- Wash hands after each activity
- Label cups clearly
- Keep small parts away from toddlers
- Clean spills right away
- Read kit instructions before starting
Science can be exciting without turning your table into a disaster zone.
Well, most of the time.
Tips for Keeping Kids Engaged
Kids do not need science to feel like a school assignment.
Try this:
- Let them choose the question
- Use a timer for excitement
- Take before-and-after photos
- Let siblings or friends compare results
- Turn the experiment into a poster
- Ask, “What should we test next?”
When children feel responsible for something, they become more invested in it.
That small shift can turn a quick activity into a real learning moment.
FAQs
What Are Easy Scientific Method Experiments For Kids?
Easy Scientific Method Experiments For Kids include paper towel absorption tests, melting ice experiments, penny cleaning tests, plant growth comparisons, and toy car friction tests. These activities use simple materials and help kids practice asking questions, making predictions, observing results, and drawing conclusions.
What Age Should Kids Learn the Scientific Method?
Kids can start learning the scientific method as early as preschool through simple observation and prediction activities. Younger children can draw what they see, while older kids can write hypotheses, measure results, and compare data.
How Do You Explain a Hypothesis to a Child?
Explain a hypothesis as a smart guess. A simple sentence frame helps: “I think ___ will happen because ___.” This teaches kids to make predictions and support their ideas with reasoning.
What Supplies Do I Need for Kids’ Science Experiments?
You can start with basic supplies like cups, water, paper towels, vinegar, baking soda, spoons, a notebook, a ruler, and safety goggles. Many great experiments use common household materials.
How can I make at-home STEM learning enjoyable?
Make STEM learning fun by letting kids ask their own questions, test real objects, draw results, and repeat experiments with small changes. Keep it playful, hands-on, and low-pressure.