How To Build A Marble Roller Coaster : Your Kid’s First Steps In Engineering
We may earn a commission for purchases made using our links. Please see our disclosure to learn more.
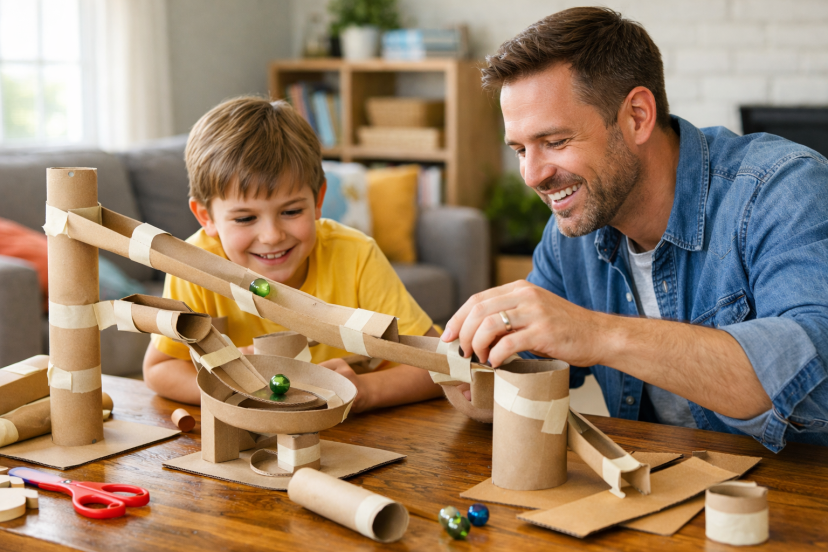
You know that moment when your kid wants a fun project, but you also want it to be something more than random clutter on the table? That is where a Marble Roller Coaster really shines. It feels like play, looks like a tiny theme park, and quietly teaches engineering, physics, patience, and problem-solving along the way.
The best part is that you do not need to be a science teacher or the kind of parent who owns labeled bins for everything. You just need a few materials, a little curiosity, and the willingness to let a few marbles fly off the track before things click.
In this guide, you will learn how to build a marble run that is simple, fun, and genuinely educational. You will also see how to make it work for different ages, what mistakes to avoid, which Amazon products can help, and what research says about why hands-on STEM activities like this matter.
Affiliate note: Some products mentioned below are examples you can check on Amazon, and I may earn a small commission at no extra cost to you.
Why kids get hooked on a marble roller coaster so fast
A marble roller coaster has instant payoff. You build something, drop the marble, and right away you find out if your idea worked.
That quick feedback is magic for kids.
It turns abstract ideas into something they can see and hear. Gravity is no longer a big textbook word. It is the reason the marble zooms down the tube, slows on a flat section, or dramatically gives up halfway like it forgot its job.
For many kids, this kind of hands-on STEM project feels less like “learning” and more like solving a really satisfying puzzle.
What your child is actually learning
This is not just craft time with marbles.
A marble run can help your child practice:
- cause and effect
- basic physics for kids
- spatial reasoning
- early engineering design
- problem-solving skills
- persistence after failure
- creative thinking
That is a lot from one project made out of cardboard, tape, and determination.
And honestly, the troubleshooting is where the real learning lives.
The simple materials you need to start
You can make a DIY roller coaster with basic household supplies.
Here is a beginner-friendly setup:
- cardboard from a cereal box or shipping box
- paper towel or toilet paper tubes
- masking tape or painter’s tape
- scissors
- marbles
- paper cups or index cards
- a wall, poster board, or sturdy box for the base
You do not need fancy materials on day one. In fact, simpler is better because it keeps the focus on building and testing, not perfection.
Start with a small design, not a masterpiece
This is where many adults accidentally make the project harder than it needs to be.
Do not begin with loops, giant towers, or a track that looks like a miniature amusement park designed by an overtired architect. Start with one high point, one slope, and one safe landing zone.
A good first goal is simple:
Can the marble travel from top to bottom without falling off?
That one question keeps the project clear and manageable.
Once that works, then you can add curves, tunnels, drops, and little “wow” moments.

Build the base first so everything else behaves
A wobbly base can ruin a good idea.
Tape your tubes or track pieces onto something sturdy. A big cardboard box standing upright works well. So does foam board or a large piece of poster board propped against a wall.
Keep these tips in mind:
- leave enough vertical space for the marble to gain speed
- tape each section firmly before testing
- angle pieces slightly downward
- avoid long flat stretches at the beginning
Think of the base like the foundation of a house. If that part is shaky, the whole thing turns into chaos very quickly.
Teach gravity, speed, and friction without sounding like a textbook
This is where the project becomes one of those STEM activities for kids that actually sticks.
You can explain the science in plain language:
Gravity
Gravity pulls the marble downward. The higher the starting point, the more energy the marble has to move through the track.
Speed
Steeper drops usually make the marble move faster. Gentle slopes slow things down.
Friction
If the track is rough, uneven, or sticky with too much tape, the marble loses speed.
You do not need a lecture. A few simple questions do the job better:
- What do you think will happen if we raise this part?
- What made the marble lose speed at this point?
- Should this section be steeper or smoother?
That kind of guided thinking helps kids connect action with understanding.
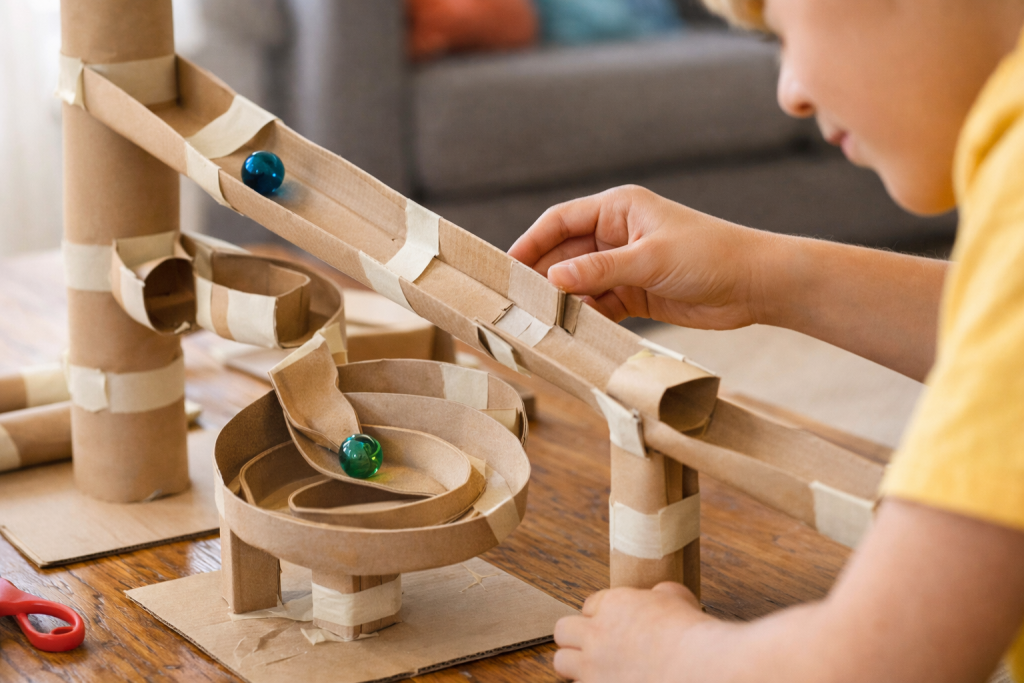
Add curves, tunnels, and drops one at a time
Once the basic run works, now the fun really begins.
Try adding features like:
- a curved tube turn
- a paper cup tunnel
- a zigzag path
- a small jump into a cup
- a funnel at the end
The trick is not to add everything at once. Add one new feature, test it, fix it, then move on.
That rhythm teaches engineering for kids in the most natural way possible: build, test, tweak, repeat.
Expect failure and treat it like part of the game
If the marble falls off, stalls, or launches into another room, that does not mean the project failed.
That is the project.
A lot of kids think being “good at STEM” means getting things right the first time. This activity shows the opposite. It teaches them that real design usually looks messy before it looks smart.
You can say things like:
- “Okay, that was interesting. What do you think happened?”
- “Let’s change one thing and test again.”
- “That did not work yet.”
That tiny word, yet, does a lot of heavy lifting.
Use questions that build confidence, not pressure
You do not need perfect explanations. You just need good prompts.
Try these:
Before building
- What kind of path do you want the marble to take?
- Where should the starting point go?
During testing
- Which part looks too flat?
- Where is the marble losing speed?
After changes
- Did that fix help?
- What should we try next?
These questions keep your child in the driver’s seat. That matters, because kids learn more deeply when they feel like thinkers, not just followers.
Make it work for toddlers, kids, and older learners
A marble roller coaster can grow with your child.
Ages 3–5
Keep it adult-led and very simple. Let them place tape, choose colors, and watch cause and effect. Use larger safe materials and close supervision around marbles.
Ages 6–8
This is the sweet spot for simple building, predicting outcomes, and basic STEM vocabulary.
Ages 9+
Now you can bring in bigger challenges like multiple paths, timed runs, steeper drops, and design limits.
If you are building a broader play-based learning setup at home, it can also pair nicely with other hands-on tools like baby development toys that encourage early curiosity.
Sneak math into the project without making it weird
A hands-on STEM project is a perfect place for math to show up quietly.
You can measure:
- height of the track
- length of each section
- number of turns
- time it takes the marble to finish
- how many tries it took before success
You can compare which design is faster, smoother, or more stable.
Suddenly, numbers have a job. And kids usually respond much better to math when it helps answer a real question.
Turn it into a classroom or family challenge
This project gets even better when there is a shared goal.
Try challenge prompts like:
- build the longest track using only five tubes
- create the slowest marble run
- make a run with two turns and one tunnel
- design a track that lands the marble in a cup
This keeps the activity fresh and makes it great for classrooms, homeschool setups, sibling teams, or rainy weekend afternoons.
Also, group builds naturally teach communication. Someone holds the tape, someone tests the slope, and someone passionately defends a terrible idea until the marble proves otherwise.
Common mistakes that make the marble run frustrating
Most problems come down to a few repeat issues.
The slope is too flat
If the marble stops early, the angle probably needs to be steeper.
The connections are loose
Even a tiny gap can derail the marble.
The track is too ambitious too soon
A huge design looks exciting, but it is harder to troubleshoot.
Too many changes at once
If you change five things, you will not know which fix actually helped.
The easiest solution is to simplify, test, and rebuild step by step.
Helpful products for building a marble roller coaster
ThinkFun Roller Coaster Challenge STEM Toy and Building Game
Great for kids who enjoy logic puzzles as much as building. It includes posts, tracks, a coaster car, and 40 challenge cards, so it works well for independent thinkers who want structure.
K’NEX Marble Coaster Run with Motor, 504 Pieces
A bigger hands-on option for kids who like dramatic builds. The motorized movement and 500+ pieces make it ideal for older kids, sibling teams, or anyone ready for a more advanced engineering challenge.
Smartivity Roller Coaster Marble Slide
A solid pick for children ages 8+ who enjoy DIY building kits with a more guided construction feel. It is especially useful for kids who want a project that feels like real assembly, not just free play.
NATIONAL GEOGRAPHIC Glowing Marble Run Construction Set
This one is great for younger builders or beginners. The glow-in-the-dark marbles, sturdy bases, storage bag, and learning guide make it a fun starter set for home STEM play.
Hape Quadrilla Cliffhanger Wooden Marble Run Blocks
Best for families who want a more durable wooden marble run with open-ended design possibilities. It is especially nice for kids who like building in 3D and reworking designs again and again.
What research says about marble run play and early engineering
A systematic literature review on engineering design in elementary learning looked at 78 peer-reviewed papers and found that engineering design activities support content knowledge, engineering design practices, engineering thinking, professional skills, and STEM career understanding. In plain English, build-and-test projects do more than keep kids busy. They help children think like problem-solvers.
Another useful source is this study on play experiences and engineering learning in children’s museums. The researchers worked with 277 families and examined how children’s prior play experiences connected to engineering problem-solving. That is a big reason marble runs work so well: they blend familiar play with real design thinking.
So when your child keeps adjusting a slope, arguing for a better turn, or insisting on “one more test,” that is not random messing around. That is hands-on learning doing exactly what it is supposed to do.
How do you build a marble roller coaster at home?
What materials work best for a homemade marble roller coaster?
Cardboard, paper tubes, tape, cups, index cards, and marbles are perfect for a beginner build. Start simple, then add extras once the basic run works.
What age is best for a marble roller coaster STEM activity?
Kids around ages 6 to 8 often get the most out of it, but younger children can enjoy a simplified version with close supervision, and older kids can handle more advanced designs.
How does a marble roller coaster teach STEM skills?
It teaches engineering design, physics concepts like gravity and friction, spatial reasoning, and problem-solving through trial, testing, and redesign.
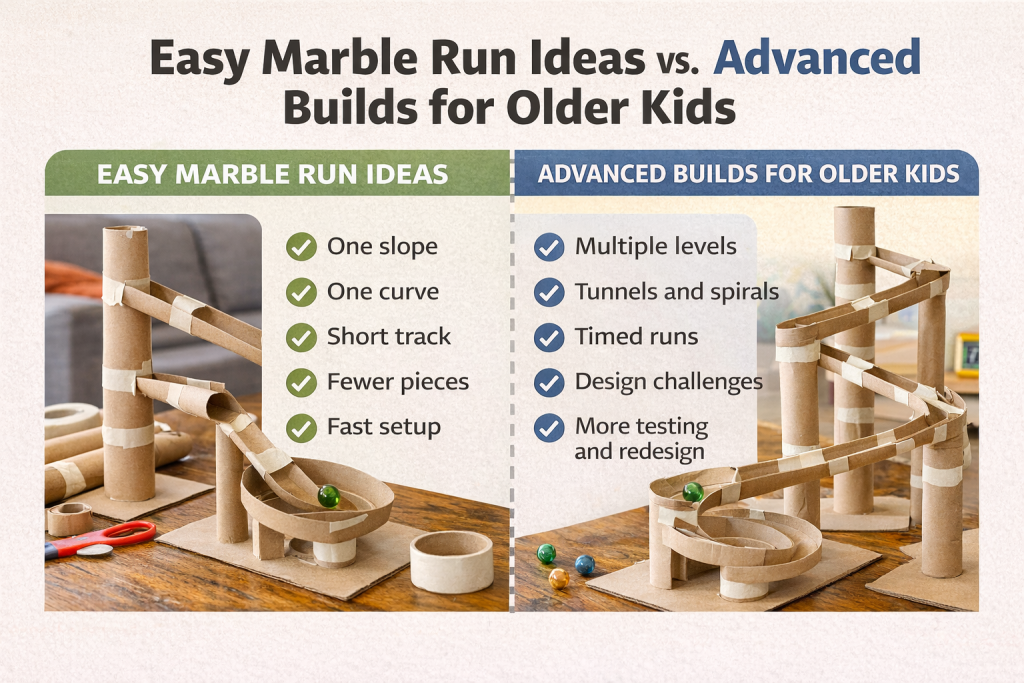
How can I make a marble roller coaster more advanced for older kids?
Add rules. Limit materials, require tunnels or turns, time the marble, or ask kids to build the longest or slowest track that still works.
What should I do if the marble keeps falling off the track?
Check the slope, tighten the tape, smooth the connections, and simplify the design. Usually one small fix makes a big difference.
Final thoughts
A marble roller coaster is one of those rare projects that feels playful, creative, and genuinely worthwhile all at once. Your child gets to build, test, rethink, and try again, which is basically the heart of engineering in kid-sized form.
So keep it simple at first. Let the design wobble a little. Let the marble miss the track a few times. That is not wasted effort. That is the learning.
And once your child sees their design finally work, you will get that little spark every STEM parent loves to see: the moment play turns into confidence.