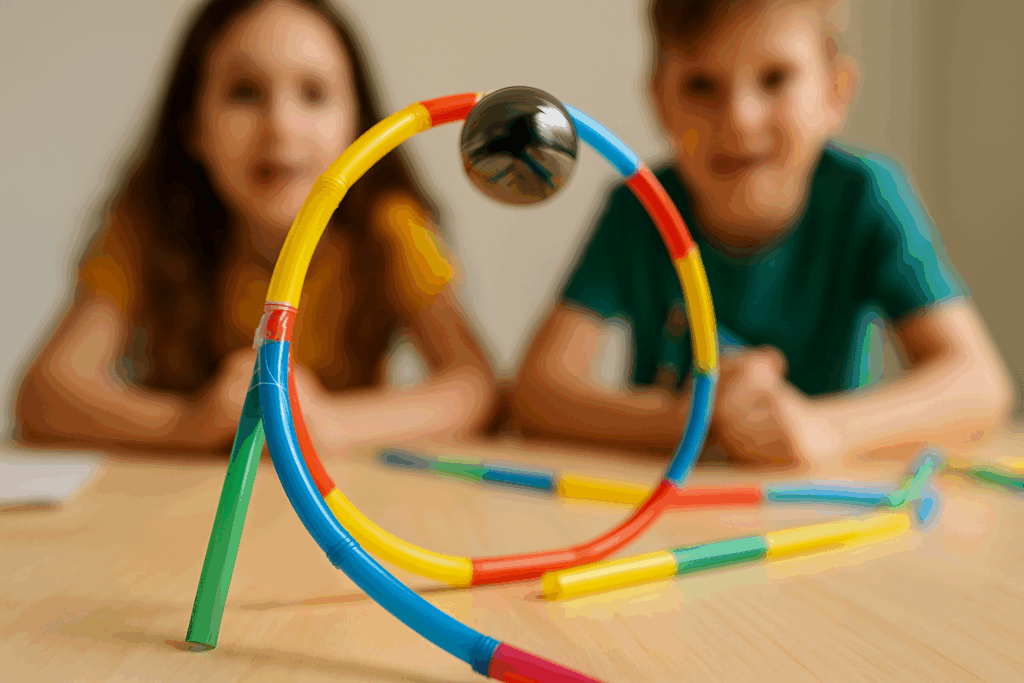
STEM Challenge For Kids: Straw Roller Coaster
We may earn a commission for purchases made using our links. Please see our disclosure to learn more.
Looking for a hands-on STEM challenge that’s exciting, educational, and budget-friendly? A straw roller coaster project might be exactly what your kids need to spark creativity and develop problem-solving skills. This fun STEM activity not only entertains but also teaches core science and engineering concepts—all with just a few basic supplies!
What Is a Straw Roller Coaster?
A straw roller coaster is a DIY project where kids build a miniature roller coaster using drinking straws, tape, and their imagination. The goal? Design a track that allows a marble (or small ball) to travel smoothly from start to finish using gravity, turns, loops, and slopes.
It’s an engaging way to introduce kids to STEM (Science, Technology, Engineering, and Math) principles—especially physics and engineering. Even better, it can be tailored for different age levels and built right on your kitchen table.
Why This STEM Challenge Is Perfect for Kids
This challenge hits all the right notes for fun and learning:
- 🔬 Science: Learn about motion, gravity, and friction.
- 🛠 Engineering: Design, test, and redesign to improve performance.
- ➕ Math: Measure lengths, angles, and experiment with slopes.
- 💡 Creativity: Kids can add loops, tunnels, and drops however they like!
Plus, it boosts critical thinking, teamwork, and patience—all essential life skills.
Materials You’ll Need
Before you start building, gather these simple supplies:
- Flexible or standard plastic drinking straws
- Clear tape or masking tape
- Scissors (for cutting the straws)
- A marble or small lightweight ball
- Cardboard or foam board (as your base)
- Ruler (optional but helpful)
- Paper and pencil for sketching designs
You might already have most of these around the house, making this STEM challenge easy to start with minimal prep.
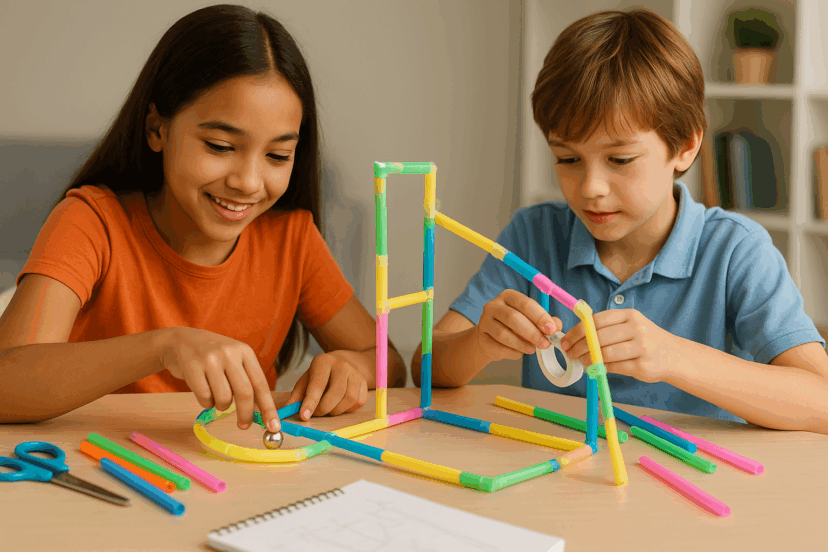
Step-by-Step: How to Build a Straw Roller Coaster
Let’s break it down into manageable steps to ensure a successful build.
Step 1: Plan Your Track
Before jumping into construction, encourage kids to sketch their design. Think about:
- Where the coaster starts and ends
- How many turns or drops to include
- How high the starting point should be
Remind them: higher starting points = more speed (thanks, gravity!).
Step 2: Build the Frame
Using your cardboard or foam base, begin attaching straw pieces as supports. These will hold up your actual track. Kids can tape vertical straws to create pillars, then build crossbeams to support turns and slopes.
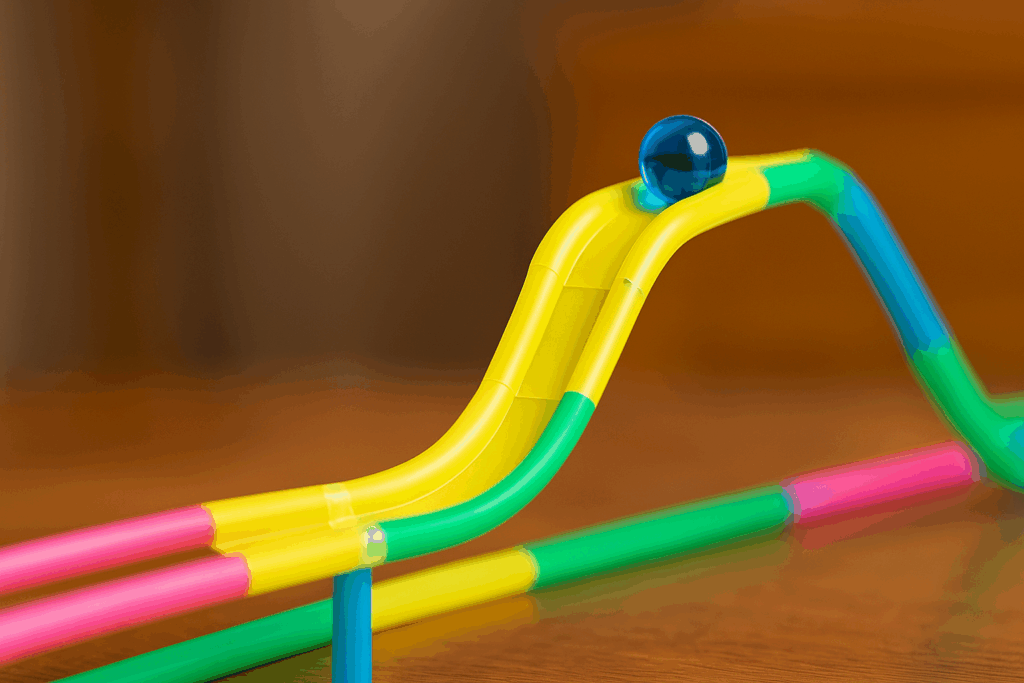
Step 3: Construct the Track
Now comes the fun part. Start building the track itself using cut or whole straws. Tape them together end-to-end, shaping them into curves, inclines, and spirals.
To make a drop: attach straws from a high point downward at a steep angle.
To make a loop: carefully bend the straws into a circle and reinforce with tape.
Encourage testing early and often. The marble should roll smoothly—if not, tweak the angles and supports.
Step 4: Test and Improve
Once the track is complete, test it thoroughly. Watch how the marble behaves:
- Does it fall off the track?
- Is there too much friction in one section?
- Are the slopes steep enough for momentum?
Ask kids to brainstorm solutions and test different ideas. The true learning takes place throughout this iterative procedure.
🧪 What Research Says About Roller Coaster STEM Challenges
Roller coaster STEM projects aren’t just fun—they’re backed by academic research as powerful learning tools. Multiple studies highlight their impact on student engagement, science understanding, and interest in engineering fields.
University-Run STEM Camps Show Strong Engagement
A comprehensive study on a roller coaster science and engineering camp revealed that students in grades 7–12 became significantly more engaged with STEM subjects after participating in hands-on activities like coaster building. The camp, organized by university outreach programs, also targeted economically disadvantaged students—highlighting its accessibility and inclusive potential.
Not only did participants develop a stronger grasp of physics principles like motion and gravity, but they also reported increased motivation to explore science and engineering careers.
Elementary STEM Units Foster Early Interest—Especially in Girls
In a more recent 2025 study, researchers explored how a roller coaster-themed STEM unit influenced elementary students. Third-grade participants showed measurable growth in both interest and understanding of core science and engineering concepts. Interestingly, the data revealed that girls demonstrated a greater increase in STEM interest over the course of the unit—suggesting that early hands-on exposure can help close gender gaps in science fields.
These findings support the idea that projects like straw roller coasters are more than crafts—they’re a gateway to long-term STEM engagement for kids of all backgrounds.
🛠️ Recommended Products for a Smoother Build
Looking to upgrade your straw roller coaster experience? These top-rated items on Amazon will help:
- ✅ STEM Straw Building Kit – 600 Pieces with Connectors – Perfect for 3D engineering builds. Durable, flexible, and classroom-tested.
- ✅ Colorful Flexible Straws – Assorted Pack – Bright colors make it easy to organize track sections and keep the build engaging.
- ✅ Marble Run Balls – 50-Pack Lightweight Marbles – Ideal for consistent testing and experimentation.
- ✅ Mini Hot Glue Gun – 20W for Craft Use – Offers secure connections and stability (with adult supervision).
- ✅ Foam Board Sheets – 12×18 inch Pack – Lightweight yet sturdy base for mounting your coaster.
What Kids Learn from This STEM Activity
This STEM challenge offers more than entertainment. It teaches kids how to:
- Apply physics concepts like kinetic and potential energy
- Design structures using real-world engineering logic
- Think critically and solve unexpected problems
- Work independently or collaborate with others
And they don’t even realize they’re learning—because they’re having so much fun!
For more hands-on learning fun, check out this guide on robots for kids—a great next step after roller coaster challenges.
Tips for Success
- Use short straw segments on curves to reduce derailments
- Always tape joints tightly—loose connections cause wobbly tracks
- Test frequently—kids learn most through trial and error
- Assign roles in group settings to build teamwork: designer, builder, tester, etc.
Conclusion: Big Fun in a Small Package
The straw roller coaster STEM challenge is the kind of activity that keeps kids engaged for hours while sneakily teaching them important STEM skills. Whether you’re a parent looking for a rainy-day project or a teacher planning a classroom activity, this simple challenge can adapt to almost any setting.
It’s hands-on learning that feels like play—because when science is fun, kids want to do more of it. 🎢
So, grab some straws, set the timer, and see what kind of roller coaster your young engineers can create!
FAQs Regarding the STEM Challenge for the Straw Roller Coaster
1. Which age range is most suited for this activity?
This challenge is ideal for kids ages 6 to 12, but it can be adapted for younger children with help or made more complex for teens.
2. Can I use paper straws instead of plastic?
Yes! Paper straws are eco-friendly and work well, though they may bend or break more easily. Reinforce with tape if needed.
3. How long does the project usually take?
Anywhere from 30 minutes to 2 hours depending on the complexity of the design and the number of test runs.
4. Is this a good classroom activity?
Absolutely. It’s great for STEM clubs, science classes, or even after-school programs. Kids can work in teams and present their final designs.
5. What if my marble keeps falling off?
Check for bumpy or misaligned connections, and make sure your slopes provide enough momentum. Also, try using a smoother or slightly heavier ball.